Wednesday, October 28, 2009
Swine flu be gone!

Oh H1N1, you swine, you! You snuck into my house disguised as a chest cold on the innocent mouth and nose of my husband. You were so benign in he, your first victim, that we didn't suspect it was you. Not a temperature was taken. A brow was raised at the depth of his cough, but H1N1, we thought we were safe from you. He was able to go to work and function as normal. He was fine in days. We thought we were safe.
We held a fabulous goodbye party for a dear coworker. Thirty people, a handful of them children, came to our house to celebrate her work and wish her well in her new adventure. All the while, H1N1, you lurked in the nasal passages of my son and the bronchial tubes of my chest. We had no symptoms, yet you were there, shedding your reproductions with our every breath. How many innocent victims did you attack that evening? Everyone was exposed.
You didn't unveil your true nature until the day after the party. You unleashed your fury on my young son. The morning after the party he awoke with the terrible fever you wrought. His body pained him, his nose overflowed, his cough was deep and terrible. Hours later your vengeance hit me like a big rig truck. I was down and down hard.
Fearing secondary complications we secured a Tamiflu prescription for young C and began fighting you as soon as we could. The next day your powers began to wane in him, but you were still fighting the battle. By the second day of the prescription is was clear that C was going to win the battle and you, Swiney, were going to lose! Ha! What a mighty rapier Tamiflu was! C's fever was gone and his symptoms cleared. We waited 24 hours so your evil minions would not spread and then we took him to his daycare today. What a victory for C!
I was not so lucky. The sword of Tamiflu was not awarded to me. I had to battle your vileness on my own. But battle I did. The aches were severe; a simple touch caused much pain. Sleep avoided the entire scene leaving me restless and weary. My nose it ran like a river, my sinuses inflamed and my glands were swollen and painful. My head felt as if it would explode. And even with my best weapons, ibuprofen and the real sudafed, you seemed to win battle after battle. My fever stayed high (102) and the pains remained. I could do nothing to help myself, let alone my sweet, sick C.
Luckily my DH was able to take time off of work to help us at home. Thank you Love. You are the best!
And today things are looking better. Although your minions may be powerful, they lack stamina. The tide has begun to turn, the symptoms are dissipating and I am starting the win the battles.
Please don't get this awful flu. My DD, E, has escaped thus far. Or, if you do, may you get it mildly, like my DH.
I will be back soon. I just need to rest.
Amy
Monday, October 19, 2009
SPOOKY Halloween Banner
While this blog is primarily about my gluten free life, I never intended that to be its exclusive purpose. Occasionally I will share some other fun stuff too. Like this Halloween banner that I made to decorate our mantle.
Another BIG part of my life is as a papercrafter. While I primarily scrapbook, I also enjoy making cards and decorative items for my home.

I was inspired by a similar banner in the Scrapbook Trends 2009 Holiday Book. You can view the project and download instructions at their blog.
I did my Halloween banner by looking at the picture in the publication. First I started with 6 pennant shaped chipboard shapes that I traced from a stencil made by my very creative friend Kim. I think she got her shape by dissembling a Maya Road chipboard album that is no longer available. You can make one yourself by drawing a triangle and giving it a scalloped edge.
Next I covered each one in Halloween colored paper from various suppliers. I added bling to the edges by running a bead of Stickles around each pennant. I then decorated each one with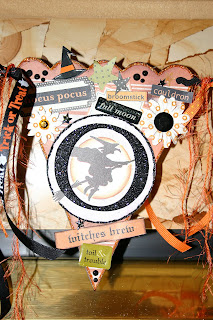 lots of Halloween stickers, ephemera, embellishments, etc. You might say I over-decorated, but I let myself go and have fun with this project. I wanted it to be a little over the top.
Finally, I took some chipboard letters, painted them black and glittered them with some Martha Stewart Black glitter. I strung the letter pennants together by putting them on a piece of black ric-rac. Halloween ribbons tied between each letter banner added the finishing touch. Very spooky, don't you think?
Here is each letter close up. I apologize for the f lash burn-out in some of them. My mantle is poorly lit for good pics without a flash. Also, in real life, they are VERY sparkly. That doesn't come through in these photos. Sigh.
Happy Halloween!


Another BIG part of my life is as a papercrafter. While I primarily scrapbook, I also enjoy making cards and decorative items for my home.

I was inspired by a similar banner in the Scrapbook Trends 2009 Holiday Book. You can view the project and download instructions at their blog.
I did my Halloween banner by looking at the picture in the publication. First I started with 6 pennant shaped chipboard shapes that I traced from a stencil made by my very creative
 friend Kim. I think she got her shape by dissembling a Maya Road chipboard album that is no longer available. You can make one yourself by drawing a triangle and giving it a scalloped edge.
Next I covered each one in Halloween colored paper from various suppliers. I added bling to the edges by running a bead of Stickles around each pennant. I then decorated each one with
 lots of Halloween stickers, ephemera, embellishments, etc. You might say I over-decorated, but I let myself go and have fun with this project. I wanted it to be a little over the top.
Finally, I took some chipboard letters, painted them black and
 glittered them with some Martha Stewart Black glitter. I strung the letter pennants together by putting them on a piece of black ric-rac. Halloween ribbons tied between each letter banner added the finishing touch. Very spooky, don't you think?
Here is each letter close up. I apologize for the f
 lash burn-out in some of them. My mantle is poorly lit for good pics without a flash. Also, in real life, they are VERY sparkly. That doesn't come through in these photos. Sigh.
Happy Halloween!

Monday, October 12, 2009
Fennel and feta salad with lemon vinaigrette
I love Autumn! Cool, crisp mornings blossom into sunny, warm days. Leaves burn with the fire of waning chlorophyll (I guess that is only poetic if you are a nerd like me). Long sleeves, fireplace smoke, pumpkins, and soup on the stove. Pets begin growing their winter coats, making them look plump and cuddly. And the cold weather vegetables return to the Farmer's Market. Once again Italian kale frequents my table. (Sorry, E, I know it is not your favorite right now, but someday you will like it.)
 Fennel is another frequent Autumn table guest. I love it prepared many ways, but this refreshing salad is one of my favorites.
Fennel and feta salad with lemon vinaigrette
2 Tbs fresh squeezed lemon juice (amount from half a lemon)
2 Tbs olive oil (you will taste the olive oil so I recommend using a good quality olive oil)
salt and pepper, to taste
1 fennel bulb, cored, stems and outer leaves removed
1/4 C crumbled feta cheese (I use the mild Pastures of Eden Feta)
In a medium bowl add the olive oil to the lemon juice by slowly pouring a light stream while whisking vigorously. This allows the mixture to emulsify. Add salt and pepper to your taste.
I prepare the feta by removing the green stems and fronds, the outer-most leaves of the bulb and cutting out the core. After I cut the bulb in half, I thinly slice the fennel on my mandolin. I really like thin slices (1-2 millimeters) but slice as best you can or to your preference. Add the sliced fennel to the vinaigrette, toss to coat.
Add crumbled feta and toss gently. At this point I like to allow the salad about 20 minutes to come together. This allows the lemon juice to penetrate the fennel, pickling it slightly.
Makes 2 vegetable servings.
Stays crispy and fresh for next day leftovers.
Enjoy!
Giving credit where credit is due:
Since I forgot to take my own picture, the fennel bulb picture is from sassyradish, via the creative commons.
Fennel is another frequent Autumn table guest. I love it prepared many ways, but this refreshing salad is one of my favorites.Fennel and feta salad with lemon vinaigrette
2 Tbs fresh squeezed lemon juice (amount from half a lemon)
2 Tbs olive oil (you will taste the olive oil so I recommend using a good quality olive oil)
salt and pepper, to taste
1 fennel bulb, cored, stems and outer leaves removed
1/4 C crumbled feta cheese (I use the mild Pastures of Eden Feta)
In a medium bowl add the olive oil to the lemon juice by slowly pouring a light stream while whisking vigorously. This allows the mixture to emulsify. Add salt and pepper to your taste.
I prepare the feta by removing the green stems and fronds, the outer-most leaves of the bulb and cutting out the core. After I cut the bulb in half, I thinly slice the fennel on my mandolin. I really like thin slices (1-2 millimeters) but slice as best you can or to your preference. Add the sliced fennel to the vinaigrette, toss to coat.
Add crumbled feta and toss gently. At this point I like to allow the salad about 20 minutes to come together. This allows the lemon juice to penetrate the fennel, pickling it slightly.
Makes 2 vegetable servings.
Stays crispy and fresh for next day leftovers.
Enjoy!

Giving credit where credit is due:
Since I forgot to take my own picture, the fennel bulb picture is from sassyradish, via the creative commons.
Thursday, October 8, 2009
Gluten-free, fast, double ginger, stir-fry dinner
 Oh yes, fast, simple and tasty is what we are about these days. If dinner takes longer than 40 minutes to prepare, it has to wait until the weekend to get my attention. This dinner is fast and so tasty and it is one of the best ways to get my kids to eat a lot of vegetables. It could easily be prepared without any meat or tofu at all, just add the "marinade" at the end to finish and make a nice sauce.
While a stir-fry with a lot of veggies does require a bit of prep, once the chopping is done it comes together quickly. Over the years I have perfected the timing of the prep so that we are eating in about 35 minutes from start to finish. I offer my general game plan to you so you can skip the learning curve.
Double Ginger Stir-fry
Stir-fry:
oil (peanut, canola, vegetable) -you need enough to lightly coat the pan 2 times
3-5 cups total of veggies (see below for what I used)
1-3 tsps each of minced fresh ginger and fresh garlic
1 lb marinated meat/tofu
cooked rice
Simple Marinade:
4 Tbs GF, low-sodium soy sauce
1 Tbs dark sesame oil (use another oil if allergic)
1 Tbs rice vinegar or sherry or lemon juice (any acidic substance would work here)
1 tsp powdered ginger
1 tsp corn starch
1. Start the rice (especially if you are using brown rice as it will take at least 50 minutes).
2. Marinate the meat/tofu (if using); mix the marinade, cut the meat/tofu, put into bowl and stir to coat each piece. Stir occasionally until you are ready to stir-fry it. The recipe below is a marinade that my parents used since I was a kid. It is a perfect, universal marinade that I have used on all kinds of meats and fish. There is some flexibility in a few ingredients, so adjust as you see fit. My 2 chicken breasts were a whopping 1.5 lbs so I doubled the marinade recipe. We like a lot of sauce so this worked out perfectly.

3. Clean and chop the veggies. You want most of your veg to be similar in size. This makes it easier to cook and eat. For this particular batch we used a small zucchini, mushrooms, 3-colors of bell peppers, half a sweet onion, a carrot and some celery. I love a mixture of flavor, color and texture. I put all the veggies in their own little bowls so that I can add them separately.
 4. Mince the ginger and garlic. Fresh ginger and garlic is what really makes this dish sing. It is good with just the powdered ginger, but if you can get your hands on some fresh ginger root, it will take this dish from good to amazing. And don't be intimidated by the prep involved. It is super easy to peel the skin from ginger with a spoon, then I thinly slice it and then chop the slices until they are a nice mince. Fresh garlic is the same story. It really adds a flavor dimension to the dish. I buy several heads of garlic, peel them all and chop them in my food processor. I store this chopped garlic with some olive oil, in a jar with a tight lid. It keeps for at least a month.
5. Get ready to fry. I have a wok, but a large frying or saute pan would also work. I like to use peanut oil, not only because it has a high smoke temperature, but because it adds one more subtle taste to the overall layers of the meal. Refined canola oil also works (refining gives it a higher smoke point). I DO NOT recommend a delicate oil like olive. I crank up the heat to high. The idea is to cook this food fast so it maintains as much nutrients as possible and keep it moving so it doesn't burn.
6. Stir-fry! This is the general way I do my stir-fries:
- drain the marinade from the meat and set aside to be added later
- stir-fry meat until done. I test this by cutting several pieces in half.
- remove the meat to a clean bowl
- stir-fry the veggies: first carrots and celery, then onions. Next is mushrooms (we like ours a little soft), now the peppers and finally the zucchini (we like ours a little firm). I would say I put 30 seconds to 1 minute between each addition, all the while stirring and moving the veg to avoid burning.
- add fresh garlic and ginger, stir-fry until fragrant
- add marinade and allow to cook/boil at least one minute, keep stirring (if you are uncomfortable using a marinade that had meat in it, just make a second batch to add at this point).
- add meat back to pan and stir-fry until hot
- serve over the rice that should be finished by now
- enjoy!

Subscribe to:
Posts (Atom)


